How to Draw A Fancy Letter Q. Q is the 17th letter of the alphabet and is a bit unusual. Many letters have similar uppercase and lowercase letters, but not Q.
Also, check our Lizard Coloring Pages For Kids.
The two versions' differences are quite big and can make learning to draw difficult.
It is also one of the rarest letters considering how many times it appears in the English dictionary. That said, it's still a pretty cool letter that has its uses!
In this guide to drawing a fancy letter Q, we'll focus on the uppercase version of this letter and learn how to draw it in a cool style.
Now that we've shown you how to draw this design, we'll also review ways you can color and decorate the letter! You also have the option to decorate it with your ideas, so let's start the fun with step one.
How to Draw A Fancy Letter Q
Step 1
When you look at the final image of this guide, you might think that this version of the letter Q will be difficult to draw.
It's a bit of a complicated project, but what if you could make it a little easier by cheating? You can do this by using your pencil to draw a rough version of the letter.
In this case, try to match the shape with the final shape of the letter. This pencil version will help you keep the shape and size of the letters consistent.
You can try making the drawing without this planning guide. However, we strongly recommend you do this to make the drawing easier.
Anyway, we can then draw the very first line of the drawing. We'll start by simply drawing the left side of the letter.
This comprises a simple, slightly curved vertical line forming the outer left edge. That's all for now!
With that done, in the next step of the guide, we'll finish the rest of the outline.
Step 2
In the next part of the guide, we'll finalize the rest of the outline for your letter. First, we draw the right side of the letter outline.
It will look like a mirrored version of the line on the left. Next, we'll add the little pointed section at the base of the letter, which might be tricky.
Add a small, slightly curved horizontal line where the vertical line ends on the right. This creates a pointed tip on the right side.
To this pointed tip, we will add a slightly wavy line to form the base of this small section. Then add another small, pointed tip at the end of this section.
In the end, there is a small blank space that you can fill in with a small line. That completes the whole project! Now we can focus on the surprisingly complicated central part of the letter.
Step 3
When you write the letter Q normally, don't even think about the hole in the middle. However, this part of the letter is possibly the most complicated part of this project.
Instead of a simple round hole, we'll use a shape that looks a little like the letter G. We make it easier by breaking it down into smaller steps.
First, draw another slightly curved vertical line on the inside edge on the left side of the motif. This runs parallel to the outline on the left.
Next, we will add a small vertical line down to the top right of this hole shape. Again, this will end up with a pointed tip that curves inward.
You can then draw a spiral line that extends inwards and then backward. This may seem complicated, so following the reference image closely will benefit you.
Once the spiral is complete, the gap is closed by another slightly curved vertical line. That's the hardest part done!
Before adding interior details, you can erase the pencil lines if you follow the tip.
Step 4
Now it's time to add more details to your letter after you've done all the difficult parts. In our reference image, we have shown you one way to start decorating the letter.
We started by drawing some small spiral lines from two of the pointed edges of the letter. If you want, you can add a third to the remaining lace!
Next, we created a wavy pattern all over the inside of the letter. We've done this with a long, continuous wavy line inside the outline.
It looks cool and is an easy way to add great detail to your image. There are many other ways to decorate the letter if you like.
For example, you could create strips of straight lines. Or you may want to fill the letter with small shapes like dots or triangles.
You can adapt our design or use your imagination and see what you come up with! In the next step, we will add some details to the structure of the letter.
Step 5
The details we chose for the letter Q outline we worked on are quite simple but effective! First, we added some stitches along the outside and inside edges of the letter.
If you want, you can add more and cover the whole outline with that! You may prefer to remove them entirely; it's entirely up to you.
Next, we added some simple lines near the outline of the base section of the letter. They are another simple touch that breathes some life into the design.
Finally, we drew small teardrop shapes along the inner spiral in the middle of the letter. You could recreate all those little details if you like them!
Or you can keep the ones you like and change them up. Then you also have the background.
It could be filled with colors, small pictures, shapes, or other letters. You can play around with the wallpaper in the meantime, but we'll also look at some ideas in the next step.
Step 6
That was a challenging drawing, and you should be very proud to have reached this point in the guide! Now you can let the painting fun run wild.
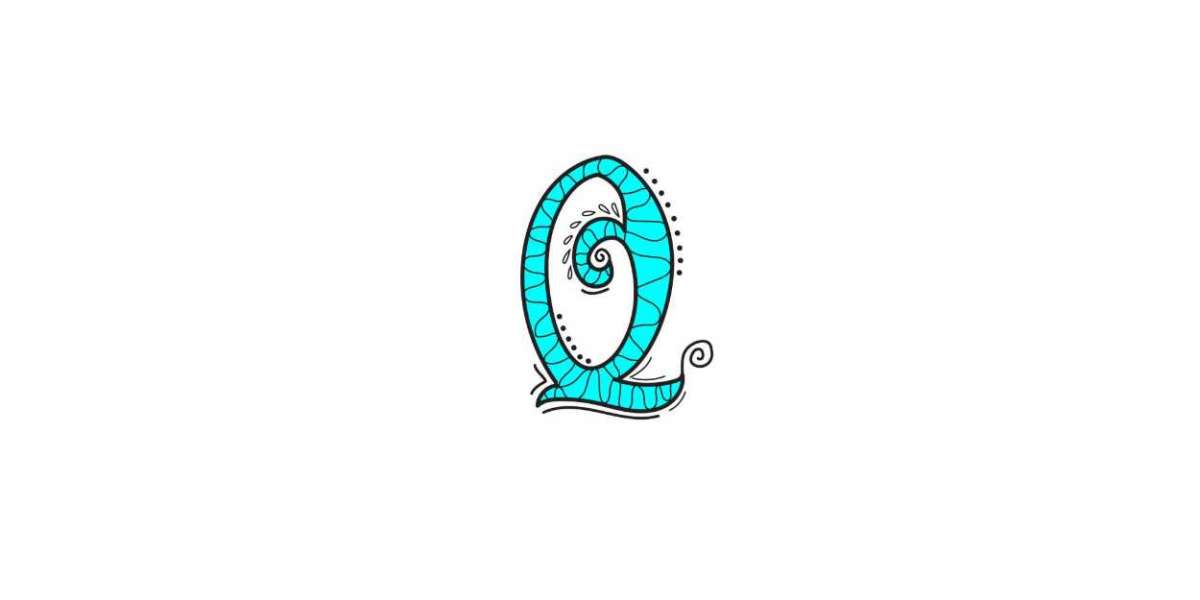
Our reference image shows you one of the endless ways you can colorize this image. We chose a light blue color to give the design a softer look.
If you like the color, try to find one closest to it in your favorite color medium and try to match it!
If you have other favorite colors, please feel free to use them. Be it bright red, bright gold, or rich green; there are so many colors to choose from.
Playing with art tools, mediums, and painting techniques can also help to make things more lively and varied.
Also, think about the background colors and how they affect your color choices for the letter itself. We gave you one color to consider, but now it's your turn to showcase all your color choices!
Your Fancy Letter Q Drawing is Finished!